Page 1 of 2 12 LastLast
Results 1 to 15 of 16

Thread: Good day - cam covers are on

  1. #1
    Join Date
    Aug 2003
    Location
    Central Iowa
    Age
    53
    Posts
    2,079

    Good day - cam covers are on

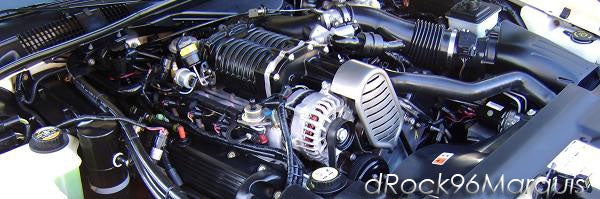
    Well, today was the day for the cam cover swap. Got started around 3:00pm and finished around 10:00pm. Worked slow and steady with some stops here and there. I won't do a complete write up as there are already good ones on here (I used those to help with mine). No real issues of any kind. Everything went back together as a came apart and did a little clean up of wire routing.

    Also figured out what my "catch" was in the steering that has been there ever since my accident in January. The repair shop forgot to re-attach the little black box that sits on the driver's side fender cover and the speaker for my alarm. The speaker was catching on the steering shaft on left hand turns. And believe it or not, the speaker still works fine. Will be bringing that up with the repair shop. By the way, what is that black box for?

    Also, pulled a code P0443 when we started it up. I think that is the MAF code, is that right. Would make sense since I had tried to start earlier with that disconnected

    Anyway, they are on and look good. These pictures aren't the greatest, but will do for now.

    Jason (Rider90), these cam covers are screaming for you work for detailing the engine bay. It is a mess from this winter. And thanks to Jim (fastblackmerc) for answering my call and helping with the motor mount question.

    Also, thanks to AZMarauder for starting the pass around covers. Couldn't have done this without him.

    OK, here are the pics:


    Eric

    2004 Silver Birch Marauder - Sold 04/17/09:
    - #2703 of 3213 '04 Marauders
    - #852 of 987 Silver Birch Marauders
    - Born On Date: 04/23/04
    - Warranty Start Date: 08/11/04
    - MINE as of: 09/09/05

    2003 CVPI - Daily Driver
    - Purchased 05/29/07


  2. #2
    Nice job! Looks good.
    03 300A Build Date 08/02
    Trilogy #151

  3. #3
    Join Date
    Jun 2002
    Location
    Four Corners,Oregon (take exit at the prison, go past the refuse transfer station, and head toward Shangri-la)
    Age
    21
    Posts
    8,304
    looks very nice. Red was a ford engine colour at one time
    Member Number 32

    Originally posted by TripleTransAm
    An interesting side note: this isn't the same forum I used to post on for years, and I've been doing a lot of reading over the past 48 hours on both sites. Looks like there's been a serious splintering. I never thought it'd be possible for this to happen to a group of owners of a car model that sold no more than 14000 copies over 2 model years. Kind of scary, when thinking of the scale. Makes one think that maybe it'd be a good idea to do some introspection and think about what each of us needs to do to build a solid community, analyze what it is we're all honestly looking for by belonging to this community.

  4. #4
    Join Date
    Oct 2004
    Location
    Rowlett
    Age
    67
    Posts
    3,780
    Why did you do them red??
    2005 Dodge 1500 Hemi Quadcab
    2020 Chevrolet Tahoe LS

  5. #5
    Join Date
    Aug 2003
    Location
    Central Iowa
    Age
    53
    Posts
    2,079
    Quote Originally Posted by Vortex View Post
    Why did you do them red??
    I wanted something to add more color to the engine bay and also something to match my brake calipers. Didn't want the higher maintenance of chrome and, personally, like the red better than the Ford GT blue.
    Eric

    2004 Silver Birch Marauder - Sold 04/17/09:
    - #2703 of 3213 '04 Marauders
    - #852 of 987 Silver Birch Marauders
    - Born On Date: 04/23/04
    - Warranty Start Date: 08/11/04
    - MINE as of: 09/09/05

    2003 CVPI - Daily Driver
    - Purchased 05/29/07


  6. #6
    Join Date
    Nov 2002
    Location
    Lawrence Twp., NJ
    Age
    73
    Posts
    14,950
    Looks good any color under the hood helps.

  7. #7
    Join Date
    Jan 2004
    Location
    Somewhere in the N.C. Triangle
    Age
    68
    Posts
    26,250
    Looks good Eric! Glad I could help you out.
    “When you can’t make them see the light, make them feel the heat.”
    Ronald Regan

    "The only way to deal with the Islamic State - these blood thirsty, blood-drunken, terrorists -
    is to kill them, keep on killing them, until you kill the last one, then you kill his pet goat."

    Lt. Colonel Ralph Peters

    “Be polite, be professional, but have a plan to kill everybody you meet.”
    "I come in peace. I didn't bring artillery. But I'm pleading with you, with tears in my eyes, if you **** with me, I'll kill you all"
    General James Mattis


  8. #8
    Join Date
    Aug 2003
    Location
    Central Iowa
    Age
    53
    Posts
    2,079
    Quote Originally Posted by fastblackmerc View Post
    Looks good Eric! Glad I could help you out.
    It was appreciated. We were scratching our heads on that one. And we did have to jack the motor up pretty far to finally get the stock one off. Funny thing is, the new one just about fell back on there.

    By the way, anyone thinking about doing this: If you have any mechanical ability, friends, and the basic tools, you can do this. Don't be scared. I almost talked myself out of it and am glad I did not. They are on, doesn't seem to be any problems or leaks, and nothing broke (knock on wood and thank you Lord).

    Hints/tricks:

    1) Move what you can to give you room - although we did it without removing the upper intake, EGR, fuel rails, injectors, etc - there is room to do it like this

    2) TAKE YOUR TIME - don't plan on being in a hurry and just let things come as they may

    3) Take everything off and get both sides to the point of ready to take the cover off. Once you get to this point, remove the driver's side and put the new driver's side on. This gave us a little sense of confidence and accomplishment. Kind of got a little excited and finished the passenger side.

    4) Motor mount bolt - when the say bolt (singular), they mean bolt (singular). If you are a Chevy guy and crawl under there looking for a bolt going through the motor mount that kind of clamps the mount together you will be there all day trying to figure out hot to get out the 3 bolts that bolt a mount to the block - forget about these. This is a single bolt that you actually remove a nut from that you go straight up through the crossmember/K-member/cradle to get to. Unbolt the passenger side and jack the motor up at the oil pan (using a piece of wood to distribute the load on the pan) and the engine actually rocks UP on the passenger side - rolling over to the driver's side. I really didn't think this would help and thought you would want to roll the passenger side DOWN, but it actually worked. Be careful doing this as you can stretch a couple of connections/wires - specifically the one going from the harness to the alternator. Again, take you time!


    Other than that, just keep all of your bolts/nuts together with that they held down or label them. And take some before pictures or something to tell you which cam cover hold down bolts go where as some of them have little studs on them that things attach to. But even if you don't write it down, it will be relatively intuitive where they go when you start to re-attach things.

    Again, plan a whole day, at least, to do it. It was basically just 2 of us working on it. We could have been done sooner, but we were working at a buddy's shop and spent time looking for his tools and other things we needed, watching them dismantle an old Ford pickup and then rip the cab of the truck off with a skid loader (was pretty cool) - all in an effort to pull the motor and tranny, drink (Coke - was all they had. Could have used a Mt. Dew or Dr. Pepper) stops, and bathroom stops. Took 7 hours with all of that. Guys start earlier and you are done by dinner time.

    Couple things to make sure you have:

    1) fuel fitting release tool
    2) spark plug gapper (if you are doing new plugs, like I did, at the same time)
    3) Anti-seize (used on the spark plug threads)
    4) "Cheeze-whiz" can of black silicone/gasket maker - you need this for 2 spots on each head - you will see when you pull the old ones off
    5) Razor blade or scraper and some scotch brite pads and small towels - used to clean old gasket in #4 and the rest of the mounting surface
    6) in/lb torque wrench - I torqued or checked torque on the spark plugs, cam retainers, and the cam cover bolts
    7) Die-electric grease - used on the spark plug end of the spark plug boots
    8) Air/Impact gun for the motor mount nut or a really big breaker bar - mine was on there good.


    That was it. Everything else is a good set of metric regular and deep well sockets and metric wrenches, regular and phillips screw drivers.
    Eric

    2004 Silver Birch Marauder - Sold 04/17/09:
    - #2703 of 3213 '04 Marauders
    - #852 of 987 Silver Birch Marauders
    - Born On Date: 04/23/04
    - Warranty Start Date: 08/11/04
    - MINE as of: 09/09/05

    2003 CVPI - Daily Driver
    - Purchased 05/29/07


  9. #9
    Join Date
    Aug 2003
    Location
    Central Iowa
    Age
    53
    Posts
    2,079
    Now I can't wait for the new coil covers from Daniel!!! I will have to find a good looking bolt to hold them down with as those brass ones look out of place, but I like how easy there are to get on and off.
    Eric

    2004 Silver Birch Marauder - Sold 04/17/09:
    - #2703 of 3213 '04 Marauders
    - #852 of 987 Silver Birch Marauders
    - Born On Date: 04/23/04
    - Warranty Start Date: 08/11/04
    - MINE as of: 09/09/05

    2003 CVPI - Daily Driver
    - Purchased 05/29/07


  10. #10
    Join Date
    Aug 2003
    Location
    Central Iowa
    Age
    53
    Posts
    2,079
    Couple quick questions:

    1) What is a code: P0443? I thought it was the MAF, cleared with the Xcal2 and it came back. Looked under hood and there was a connector off on the piece that attaches to the cowl on the driver's side of the engine bay. What is that part? Cleared again and hasn't come back yet.

    2) Anyone know what the black box is that mounts on the top of the driver's side fender well in the engine bay? It is a square box with a single vacuum type line coming out of it.
    Eric

    2004 Silver Birch Marauder - Sold 04/17/09:
    - #2703 of 3213 '04 Marauders
    - #852 of 987 Silver Birch Marauders
    - Born On Date: 04/23/04
    - Warranty Start Date: 08/11/04
    - MINE as of: 09/09/05

    2003 CVPI - Daily Driver
    - Purchased 05/29/07


  11. #11
    Join Date
    Apr 2005
    Location
    Frederick County, MD
    Posts
    510
    Looks great!

    The small black box you are reffering to is a vacuum reservoir.


    p0443 is for the EVAP system
    <table border="1" cellpadding="3" cellspacing="0"> <tbody><tr><th align="center" valign="bottom">Diagnostic Trouble Code </th> <th align="center" valign="bottom">Descriptions </th> <th align="center" valign="bottom">Possible Causes </th> <th align="center" valign="bottom">Diagnostic Aids </th></tr></tbody> </table>
    <table border="1" cellpadding="3" cellspacing="0"> <tbody><tr><td align="left" valign="top">P0443 - EVAP Control System Canister Purge Valve Circuit Malfunction
    </td> <td align="left" valign="top">The PCM monitors the state of the EVAP canister purge valve circuit output driver. The test fails when the signal moves outside the minimum or maximum limit for the commanded state. </td> <td align="left" valign="top">
    • VPWR circuit open.
    • EVAP canister purge valve circuit shorted to GND.
    • Damaged EVAP canister purge valve.
    • EVAP canister purge valve circuit open.
    • EVAP canister purge valve circuit shorted to VPWR.
    • Damaged PCM.
    </td> <td align="left" valign="top">To verify normal function, monitor the EVAP canister purge valve signal PID EVAPPDC (or EVMV for electronic valve) and the signal voltage (PCM control side). With the valve closed, the EVAPPDC indicates a 0% duty cycle (0 mA for EVMV) and voltage approximately equal to battery voltage. When the valve is commanded fully open, EVAPPDC indicates 100% duty cycle (1000mA for EVMV) and a voltage drop of 3 volts minimum is normal. Output test mode may be used to switch output on/off to verify function. </td></tr></tbody> </table>

    That connector on cowl was probably it, disconnected EVAP purge valve is very common after working around the engine bay.
    If it doesn't come up again don't worry.

    Evap purge valve is on firewall, with two EVAP hose connections and one harness connector.
    -My Homepage and Panther tech-

    My Mint 96' Mercury Grand Marquis Supercharged LSE -
    Modifications
    Click My Merc for more Pics!

  12. #12
    They look great!

    Looks like I have my work cut out for me though!

  13. #13
    Join Date
    Aug 2003
    Location
    Central Iowa
    Age
    53
    Posts
    2,079
    Quote Originally Posted by Rider90 View Post
    They look great!

    Looks like I have my work cut out for me though!

    Yes, it has been a rough winter. And if I had opened my hood and looked around in there sometime over the 2 1/2 months, I would have found the "catch" in my steering back then. Weather just has been crappy around here and no more garage space for washing in the winter like I had before.
    Eric

    2004 Silver Birch Marauder - Sold 04/17/09:
    - #2703 of 3213 '04 Marauders
    - #852 of 987 Silver Birch Marauders
    - Born On Date: 04/23/04
    - Warranty Start Date: 08/11/04
    - MINE as of: 09/09/05

    2003 CVPI - Daily Driver
    - Purchased 05/29/07


  14. #14
    Join Date
    Jan 2006
    Location
    Central Ohio
    Posts
    6,218
    Wow.....them purdy red covers shore do look good unter ther....


    KillJoy

  15. #15
    Join Date
    Oct 2006
    Location
    Alexandria, VA / Ocean City, MD
    Age
    48
    Posts
    846
    Quote Originally Posted by Eric91Z View Post
    Well, today was the day for the cam cover swap.
    Are those just your stock covers painted? Are they powder coated? What did you do for down time (while they were off being prepped), or did the "swap" reference allow you to remove the old and install these? Like a core... I've been thinking alot about doing something similar with mine... Any answers/advice would be great. - C


    2004 Mercury Marauder DTR:
    #320 of 982 & #1036 of 3213
    NOVI 1200-SL *Supercharged*
    492.6 HP / 430.0 ft-lbs - 09/25/08
    -Full Stainless Exhaust by Exotic (!!!LOUD!!!)
    -Flowmaster Super 44s & 4" Delete Tips - Wes
    -Richmond 4.10's
    -Ford Racing M-4033-G1 Aluminum Axle Girdle
    -Tuned by ZACK
    -Pro-Guard
    -KDW2 Tires
    1998 P-71 POLICE INTERCEPTOR "Embassy Edition"
    1985 Mustang GT 5.0 HO 4bb (my first car)
    1982 Ford Clubwagon XLT 5.0 - "Ol' Blue 82"
    1973 Ford Bronco - w/ a Fuel Injected 5.0
    --------------------------------------------------

    60' ... 1.927
    1/8 ... 7.932
    MPH ... 92.08
    1/4 ... 12.231
    MPH ... 116.29

Page 1 of 2 12 LastLast

Thread Information

Users Browsing this Thread

There are currently 1 users browsing this thread. (0 members and 1 guests)

Similar Threads

  1. CAM Video day
    By ctrlraven in forum Capital Area Marauders
    Replies: 22
    Last Post: 10-16-2006, 04:46 PM
  2. Driving Schools????
    By KillJoy in forum Community Discussion
    Replies: 6
    Last Post: 10-02-2006, 09:30 AM
  3. September CAM Meet
    By Breadfan in forum Capital Area Marauders
    Replies: 10
    Last Post: 09-19-2006, 11:15 AM
  4. '66 Spitfire for sale - a good idea?
    By Breadfan in forum The Lounge
    Replies: 6
    Last Post: 07-06-2005, 09:07 PM

Posting Permissions

  • You may not post new threads
  • You may not post replies
  • You may not post attachments
  • You may not edit your posts
  •