FYI every single Baer brake kit owner shares the same problem with the wheel weights.
It's a non-issue


 Turbo Marauder

FYI every single Baer brake kit owner shares the same problem with the wheel weights.
It's a non-issue
 Supporting Vendor

i can vouch my baer brakes have the caliper ground.Originally Posted by Zack

in other words stfu and deal with it (in my nice voice)
Those were the days.........
DANG THEY'RE CUTE!!!!!!
Smile and Nod
I love THIS bar
 Senior Member
have been waiting patiently for Logizyme to post photos and report form weekend track day.......
2006 Crown Victoria LX Sport
1998 Mercury Grand Marquis LS, HPP package
 300B
300B
That makes 2 of us. Ordered my rotors last night. Then calipers and pads...
2003 Black/Light Flint MM, PROCHARGER D1SC#30, 4.10 GEARS, REAR COOLING MOD, ZACK BIG BRAKE KIT, 3500 STALL, WIDENED REAR WHEELS.
1993 MUSTANG LX HATCH, 347 STROKER, 3.73 GEARS, TUBULAR K MEMBER, TKO 3550 TRANNY, AEROSPACE DUAL PISTON BREAKS.
Senior Member
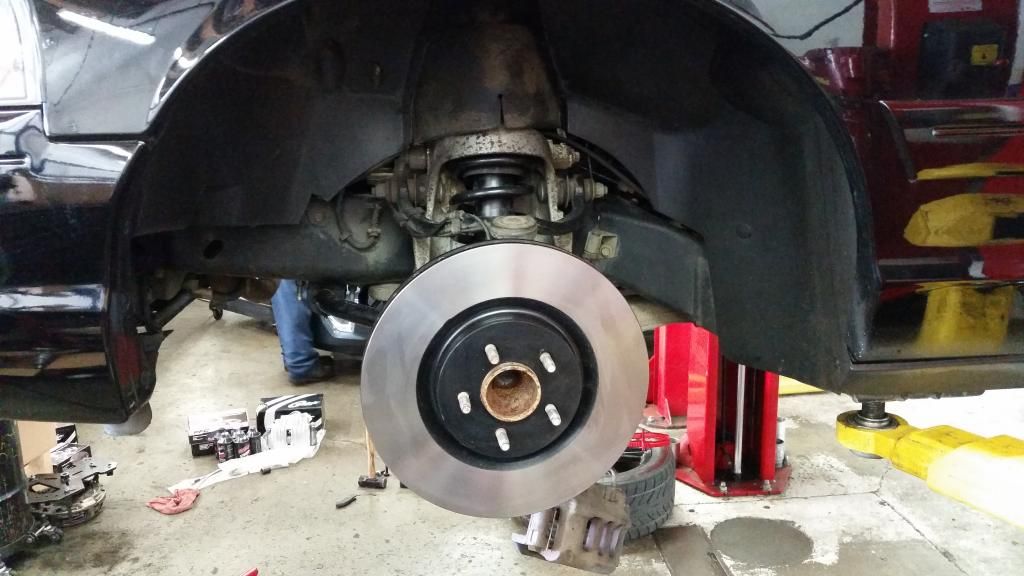
This write up is a general walk through on how to remove the existing front brakes, including caliper and bracket, rotor, pads and brake hose, and install the Zack adapter brackets, C5 calipers and pads, GT500 rotor, and TCE Zack SS hoses, along with the modifications required for fitment. Sorry for the lack of pictures at the end, I was busy working quickly so I did not loose all of my brake fluid.
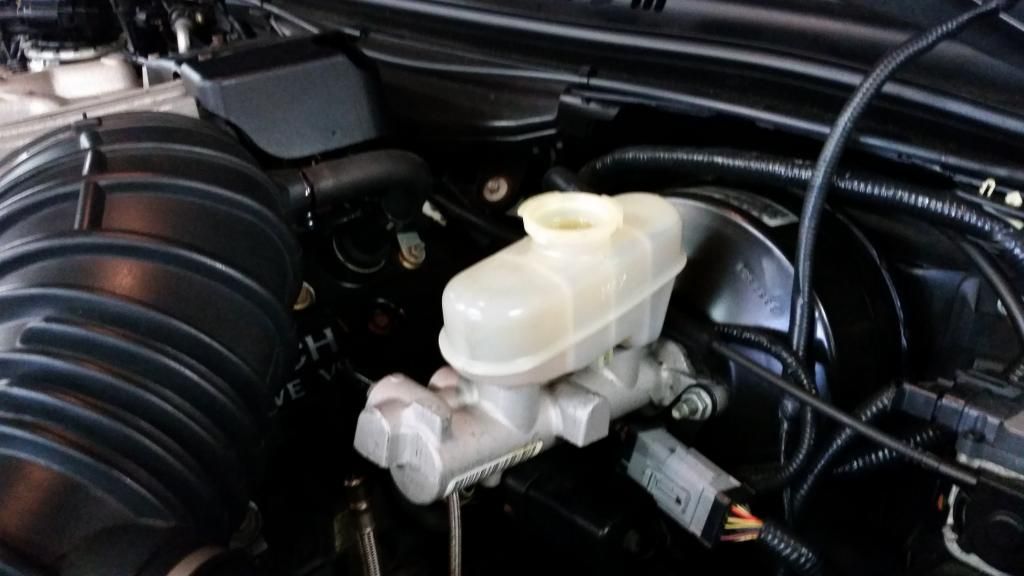
Open the hood.
Remove the master cylinder brake fluid reservoir cap.
Check and top off the brake fluid level.
*Note* brake fluid is very damaging to paint, if any is spilled on painted surfaces quickly clean with soapy water.
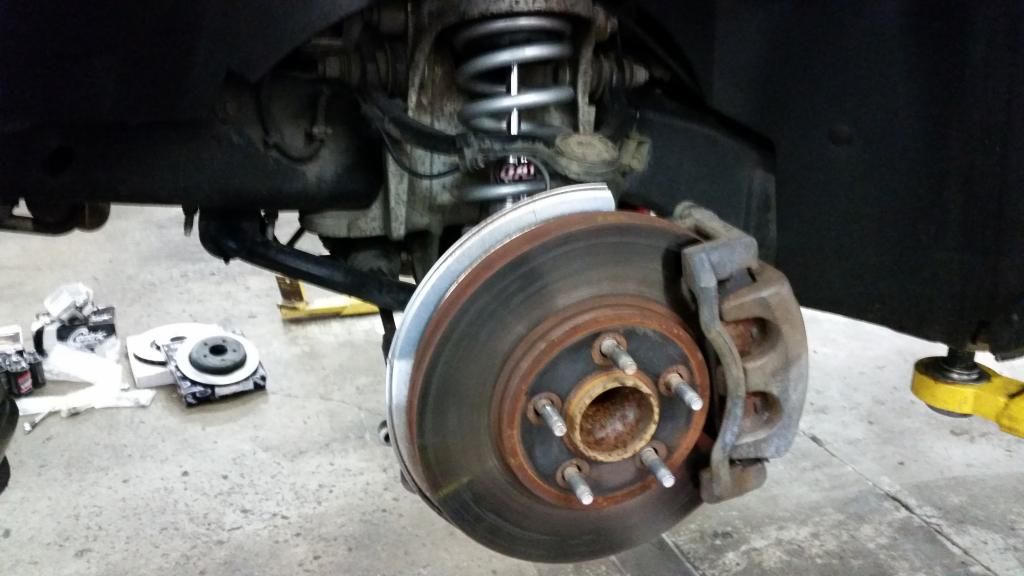
Lift the vehicle, or jack up and safely support the front of the vehicle.
Remove both front tire and wheel assemblies.
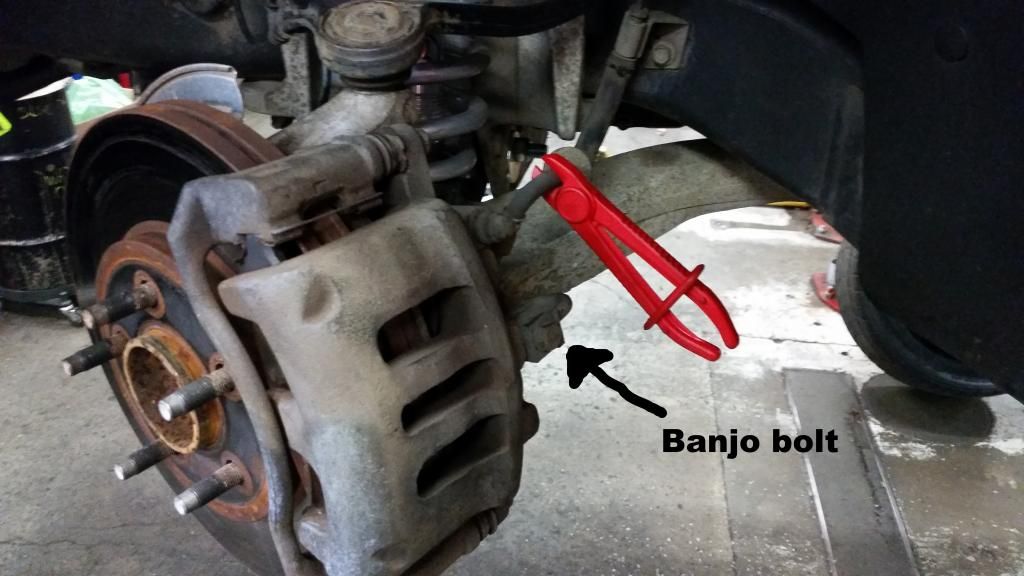
Using hose pinch off pliers, pinch off both front brake hoses.
Remove the brake hose to caliper banjo bolt.
Repeat on the other side.
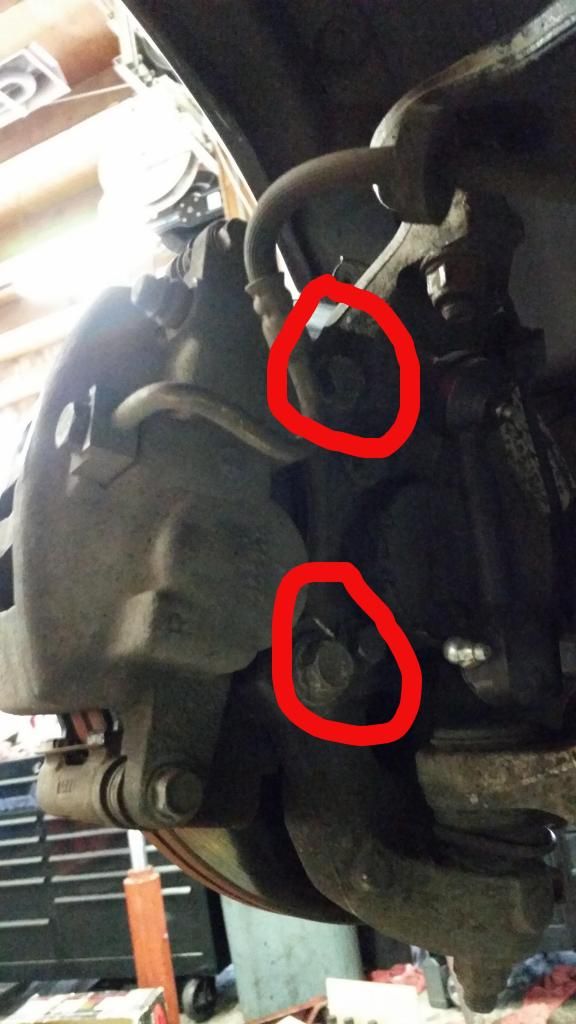
Remove both 18mm Caliper bracket to steering knuckle bolts.
Remove the caliper and caliper bracket assembly with pads.
Repeat on the other side.
Remove the rotor.
Repeat on the other side.
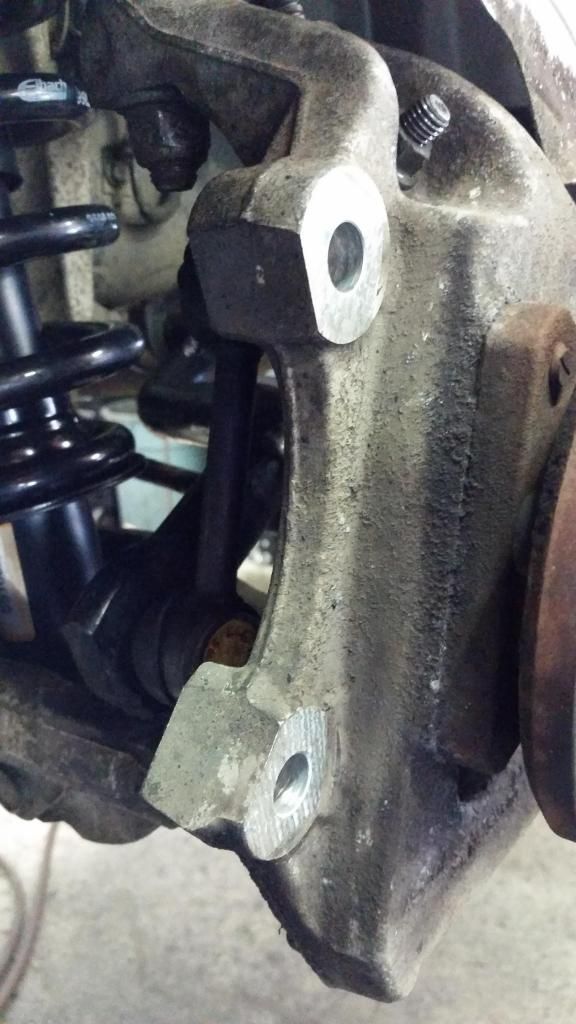
Lightly grind down the edge of the ears of the mounting holes on the steering knuckle. This will allow clearance of the Zack adapter brackets. Test fit the bracket as you grind so you only remove the minimum amount of material. Once the bolts can be threaded into the bracket this step is complete. I used a die grinder and a coarse resurface disc.
Repeat on the other side.
*Note* Eye protection and a respirator are recommended safety equipment during this procedure.
How to video
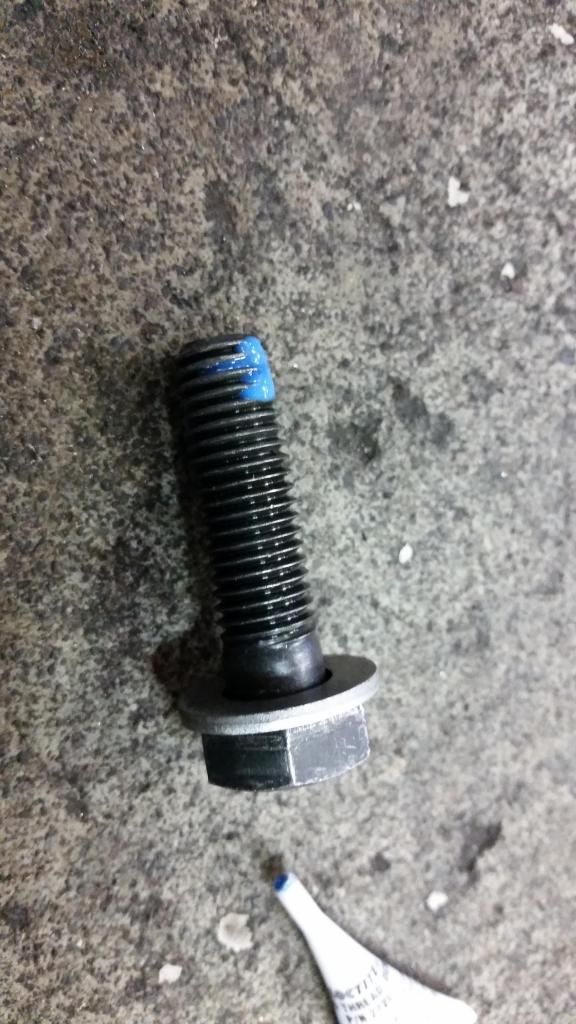
Install one washer on each of the 8 bolts included with the Zack brackets.
Liberally apply medium strength(blue) Loctite on each of the bolts.
Install two of the short bolts through the front of the steering knuckle, into the threaded holes of the Zack bracket.
Tighten.
Repeat on the other side.
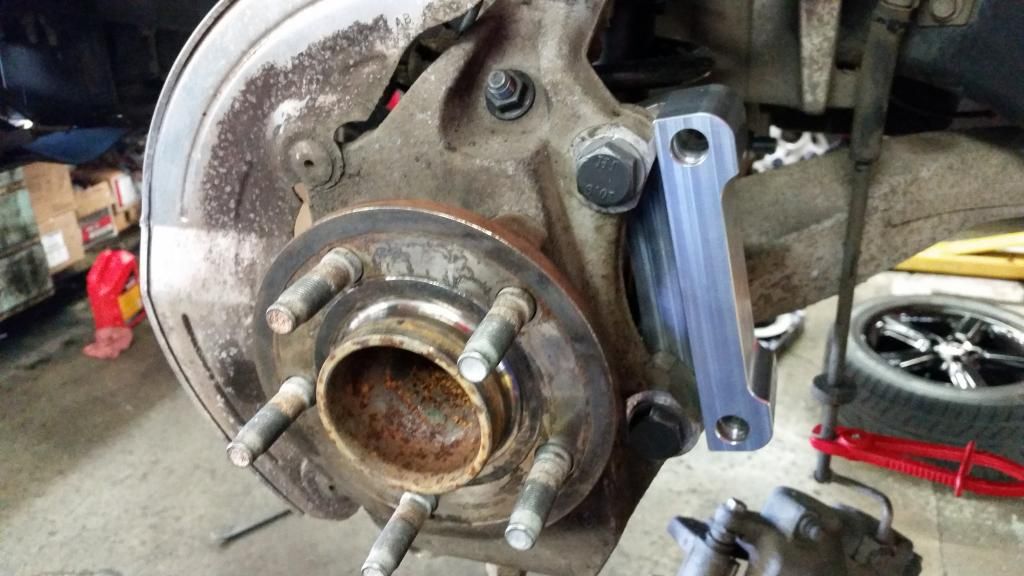
Grind the center bore of the new GT500 rotor and test fit onto the hub. Repeat grinding until the rotor slides fully onto the hub. I used a die grinder and a carbine grinding bit.
Repeat on the other side.
*Note* Eye protection and a respirator are recommended safety equipment during this procedure.
How to video
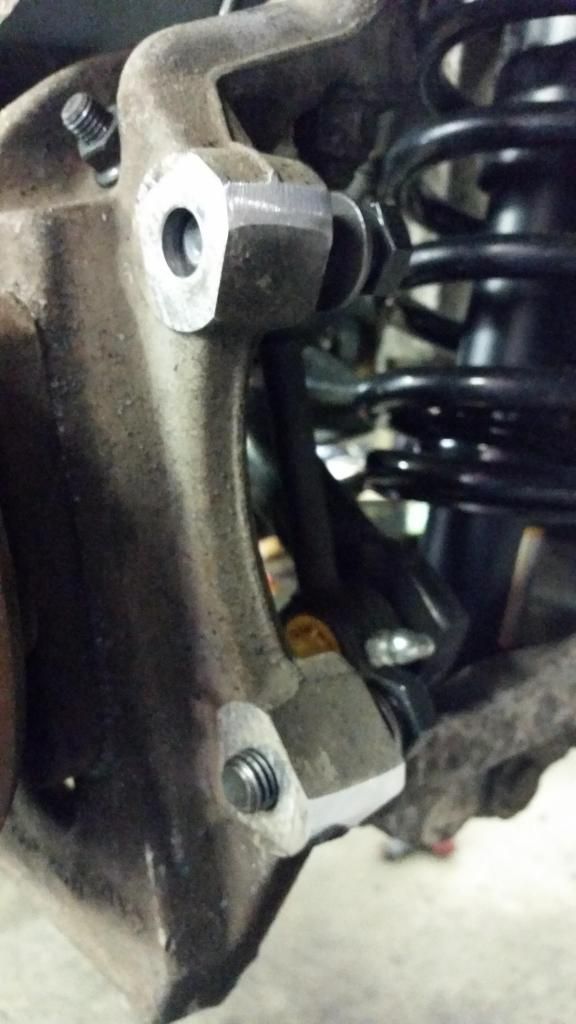
Remove the C5 caliper brackets from the calipers.
Slide the caliper bracket over the rotor.
Install two of the long bolts supplied with the Zack brackets through the back of the adapter bracket and into the caliper bracket.
Tighten the bolts.
Install the caliper hardware clips.
Install the brake pads.
Repeat on the other side.
Install the caliper over the caliper bracket and pads.
Install the caliper slide pin bolts.
*Note* during the following procedures check and top off the brake fluid level frequently ensuring the brake fluid reservoir stays above the minimum line.
Loosely install the TCE brake line onto the caliper using the supplied banjo bolt and copper washers.
Using a 13mm flare nut wrench, remove the old brake hose from the hard line at the frame.
Remove the 13mm bolt holding the hose bracket to the frame.
Install the TCE supplied hose bracket to the frame using the original bolt.
Install the TCE brake hose through the bracket.
Holding the brake hose hex with a 17mm wrench, tighten the 13mm flare nut to the brake hose.
Rotate the brake hose on the caliper for best clearance and tighten the banjo bolt.
Loosen the caliper bleeder screw.
Bleed the brake fluid.
Repeat on the other side.
Clearance the wheel weights.
Install the front tire and wheel assemblies.
Test drive.
Break in the new brakes.
Last edited by Logizyme; 09-24-2014 at 10:58 PM.
I eat apples until my stomach feels much more full than its normal.
Senior Member
At the track being put to the test:
Was a great track day at a new coarse for me; Oregon Raceway Park. A very technical track, slower speeds, plenty of corners, verticality and camber. The car performed great. The tires were getting just the right amount of sticky, and the suspension was dialed in and kicking butt. Engine and trans did not skip a beat all day. I took many cars by surprise when I snuck up on them, including two 05-09 Mustang GT's, a 00-04 Mustang Saleen, and a newer BMW 3 series, and a handful of Mini's. I also managed to come into a turn a bit hot and brake a bit late taking my car off the track and into the dirt, I recognized that it was going to happen and handled the situation exactly as I should have so I have no shame for getting a little dusty. The only car to pass me all day was a Mini Cooper S with slicks, I imagine he had some other mods I couldn't see going on, but he was quick around this twisty coarse. Great day.
Last edited by Logizyme; 09-24-2014 at 11:32 PM.
I eat apples until my stomach feels much more full than its normal.
Senior Member
Preliminary review:
Overall I am somewhat dissatisfied with this setup.
After a brutal day at the track I can say that this setup has produced a moderate improvement in performance. I was not able to stop on a dime, but the setup did prolong the onset and reduce the severity of brake fade, but not by large milestones.
Fitment is somewhat sub par, enough to cause minor issues. The caliper fitment is slightly too far out causing the pads to extend off the end of the rotor, which I suspect is the cause of some brake noise I have experienced. The C5 caliper is designed for a 12.8 inch rotor, and this makes getting perfect fitment over the 14 inch rotor difficult and with little room for error so I am not surprised by this fitment issue. In order to get the caliper further onto the rotor the knuckle mounting ears would need to be grinding in a different way to allow the caliper bracket further towards the knuckle. I had trouble installing the TCE brackets into the alignment holes on the frame, and ended up flattening the alignment tab on the bracket and installing without using the alignment. The caliper extending too far out has clearance issues with the outboard wheel weights and needs to be corrected, perhaps had the caliper bracket been located further onto the rotor this would give greater clearance to the wheel weights possibly allowing low profile weights to be used in the correct location without modification of the caliper. The pad width designed for the GT500 rotors is 2.5" and the C5 pad width is 2.0" meaning there is more than a 0.5" area on the inside of the rotor that is not touched by the pads and will rust, which will be especially noticeable for those of you who acquired drilled/slotted rotors, when the drilled and slotted area is all rusty and unused.
The main performance increase comes from the mass of the rotor. Brake pad size is nearly equal to stock. Unsprung weight has increased several lbs even with the weight saving aluminum caliper. Rotational weight has increased greatly. Swept rotor area has only increased marginally. OE pads are 2.25" wide, 12" outside diameter rotor, 9.75" inside swept diameter calculates to 38.6 sq in of swept area on the stock front brakes. C5 pads are 2.0" wide, 14" outside diameter GT500 rotor, 12" inside swept diameter calculates to 40.9 sq in swept area on the Zack setup, a marginal 5% increase.
I would say it is a decent visual upgrade, a moderate fade/overheat upgrade, and a slight stopping power upgrade.
Last edited by Logizyme; 09-24-2014 at 11:24 PM.
I eat apples until my stomach feels much more full than its normal.
Turbo Marauder
Not much I can say here, since this brake setup wasn't designed for track events like you are attending.
What's wrong with the pad placement in relation to the rotor?
Can you post a pic?
Turbo Marauder
I installed this on my blue and it's leaps and bounds over stock.
It's not even comparable to be honest
Senior Member
nice work, and excellent review.
any modifications to increase for more said performance? Pads etc?
how was the pedal feel?
2006 Crown Victoria LX Sport
1998 Mercury Grand Marquis LS, HPP package
Senior Member
New stock brakes are leaps and bounds over worn stock brakes. New Monroe's are leaps and bounds over worn Tokico's. New Firestone's are leaps and bounds over worn BF Goodrich.
Lifespeed
2004 Silver Birch Marauder 130K miles
Wilwood Aero6 F, NMDP R brakes, Penske 7500DA shocks, Hypercoil 600lbs F and Grand Marquis R air springs, Addco tubular sway bars, Metco control & Watts, 31 sp axles, Stainless Works cat-back exhaust, Lidio tune, American Racing AR883 9.3" 50mm F 10" 59mm R 20" wheels, Pirelli P-Zero 265/35-20, 275/40-20 tires
Coming soon: Livernois 5.0L stroker, ADTR/Vortech V2 intercooled SC, Silverfox trans and Circle D converter
Turbo Marauder
May I remind you that I probably have forgotten more about cars than you ever knew? What a douche comment.
Senior Member
The brake pad extends past the end of the rotor. This will cause a tapered wear at the end of the brake pad, and the pad will contact the outer circumference of the rotor which will undoubtedly cause noise. Any closer to the rotor and the brake bracket becomes closer to the rotor. As I mentioned getting the 12.8" design caliper over the 14" rotor leaves little room for error. A tenth outward ends up with this result and a tenth inward would result in the caliper bracket/hardware hitting the end of the rotor.
I also noted that caliper offset was not perfect, IIRC it was slightly too positive. No where near enough to create problems, it was just not perfect.
I should also note that I am using the same formula pads as I did previously. The pad formula has allot to do with stopping power, feel, and grab.
If you changed formula, or even brand when doing your swap that could result in large difference you've noticed, or perhaps you may have gotten used to the soft pedal you had until you got your brakes fully bled, somewhat of a placebo effect, its happened to all of us. Finally you've said you barely drive it, how many miles have you put on the setup? Enough to fully break them in? I've put over 700 miles on this setup so far.
My review is still preliminary. After my trip and track day I need to get the vehicle back in the air and check the entire system, including a pad inspection. 700 miles and one track day is still not enough to say for sure exactly how well this setup performs.
I eat apples until my stomach feels much more full than its normal.
Senior Member
Because the pads are contoured for a smaller rotor, only the middle of the pad extends past the rotor.
I tracked the OE brakes, and maybe I'm wrong but this setup should be considered and upgrade right?
I would consider trying a different set of pads to increase performance.
Pedal feel was normal, high and hard as expected with performance pads.
I eat apples until my stomach feels much more full than its normal.
Turbo Marauder
I appreciate the feedback. On my car the pad is 1/16" below the top of the rotor and the caliper centering is dead nuts accurate
It's very possible different parts will yield different results
There are currently 2 users browsing this thread. (0 members and 2 guests)
 Posting Permissions

 Reply With Quote